
 Україна
 Méjico
Improve the efficiency of your farm’s cool cell systems by cleaning and adjusting them this spring.
Comments (0)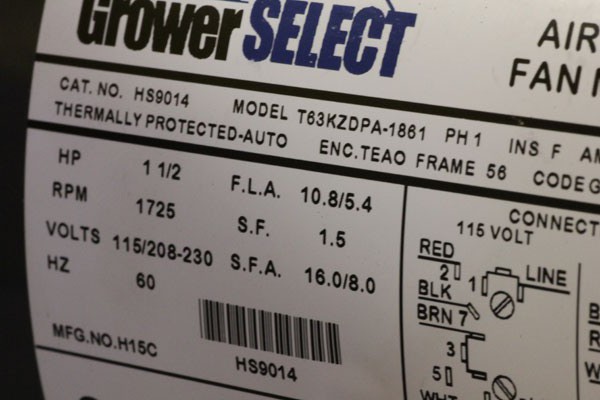
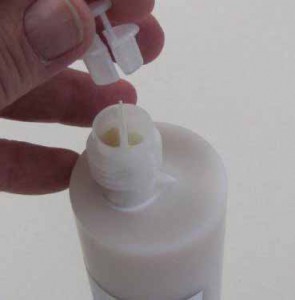
Nameplate from GrowerSELECT fan motor
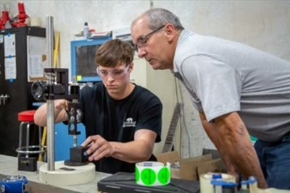
Today’s livestock and poultry operations rely on electric motors for a variety of feeding and ventilation functions. Used in buildings that can be both dusty and humid, with fluctuations in voltage and varying workloads we subject our motors to a very hostile work environment.
When selecting replacement motors, it is important to select motors that are both efficient and designed with a “safety factor” that will allow them to last under harsh conditions.
While you may be familiar with the term Service Factor or S.F., there are a couple of important designations found on a motor nameplate that may need more clarification.
Service Factor is defined as a motor’s ability to operate under a short-term load. The higher a motor’s S.F. rating, the more durable the motor. Motors with high S.F. are expected to last longer. To illustrate, a 1-1/2 Hp motor with a 1.5 S.F. can provide 2.25 Hp for short-term use. However, it is not a good practice to continuously operate a motor above the rated workload. In other words, the same 1-1/2 Hp motor with 1.5 SF would not be selected to power a 60″ fan originally shipped with a 2 Hp motor.
Full Load Amps or F.L.A. represents the amount of current the motor is designed to draw at the rated horsepower. In the example nameplate, this means that when the motor is running under a full load at 230 volts, we can expect it to draw 5.4 amps. Motors with a lower F.L.A. for the amount of horsepower are considered more efficient to operate.
Service Factor Amps or S.F.A. represents the amount of current the motor will draw when running at the full Service Factor. In the example nameplate, the S.F.A. is eight amps at 230 volts.
Continually exceeding the S.F.A. shown on the nameplate can shorten motor life. Motors with a higher S.F.for the same horsepower have an increased “safety factor” and are expected to last longer under harsh conditions.
The most efficient, rugged motors are designed with a higher S.F., lower F.L.A., and higher S.F.A ratings. By comparing the information on a motor nameplate, we can select the best replacement motors for feeding and ventilation equipment.
Hog Slat designed the GrowerSELECT line of motors to help simplify a producer’s decision on selecting replacement motors. GrowerSELECT motors feature a high Service Factor (as high as 1.5) and higher S.F.A. rating to increase motor life. Each model number is a direct cross to the most popular brands of feed systems and fans used on producers’ farms. No matter what your existing brand of equipment we have a GrowerSELECT motor designed to replace it and save money while doing so. Shop GrowerSELECT motors.
As my family and I traveled through Iowa last weekend, I couldn’t help but take notice of several finishing buildings that had been sitting empty for the last year or so. The curtains were down and pit fans running…they were filled with pigs again. Even though pigs are hard on equipment, nothing is harder on buildings than just sitting empty. Motors seize up; bolts and latches rust in place and the gating needs some general repair. To help with gating repairs, Hog Slat manufacturers a DIY product called Cut and Weld panels. Cut and Weld panels allow producers to build gating “on-site” to the exact length needed.
Cut and Weld panels are available in two lengths; 6’-9’ and 9’- 12’ long. Cut and Weld panels are a standard 31 ½” high panel with one end upright tacked in place instead of welded solid.
You simply tap the upright loose and slide it along the horizontal rods until you reach the length desired.

You then weld the rods to the upright and top angle and cut off the excess.

Then, depending on the application, you can choose from a full range of tabs, pipes, latches, etc. to complete the gate. Finish the project off with a coating of Hog Slat blue spray paint to help prevent rust and you’re ready to install a gate fitted to the exact size you needed.

The DIY Cut and Weld panels and all the accessories are in stock at every Hog Slat store located in the Midwest.

By Virginie Buck,
Dosatron International
Everyone knows that water-powered medicators are the easiest way to administer a wide variety of medications, vaccinations and supplements. But after you buy a medicator, there are several things you can do to make sure you get the most bang for your buck from your equipment, and that it will last a long time.
When installing your medicator, be sure to plumb an 80 micron/200 mesh filter on the inlet side of the medicator. This will ensure that your medicator will be protected from poor water quality conditions that can potentially damage your unit. This will also protect any equipment you have downstream from the medicator, such as nipples, valves, and drinkers, from getting clogged and wearing out prematurely.
Also, make sure that your concentrate bucket is clean and free from debris that could get sucked up inside the medicator and jam the check valve. A good rule of thumb is to secure your hose at least 4” up from the bottom of the stock tank so that heavy debris is not sucked up into the medicator.
Always be sure that your maximum flow rate stays within the maximum capacity of your medicator. Be sure to check with your medicator’s manufacturer for specifications and for ways to determine flow rate. If you determine that your flow rate is higher than the maximum recommended, you may want to consider switching to a model with a higher maximum flow rate. Turning your water on slowly will gradually pressurize the system, helping to prevent a rush of water through the pipes that could be harmful to the equipment.
One of the most important things you can do to protect your medicator is to keep up the medicator’s maintenance schedule, which you should be able to get from your medicator’s manufacturer.
Flushing your medicator with clear water may be the single most important tip I can give.

Medicators are one of the most important weapons in your arsenal when it comes to keeping your animals as healthy as possible. By following these simple best practices, you’ll make sure that your medicator continues to work hard for you for years to come.
Last year the Midwest received an abnormal amount of snowfall and rain along with strong winds. The wind piled ice and snow in large drifts on the barns roofs that exceeded the rafters designed load.
Number 1 rule to protect your buildings during the upcoming winter season? PROMPTLY REMOVE THE SNOW AND ICE FROM YOUR BUILDINGS!
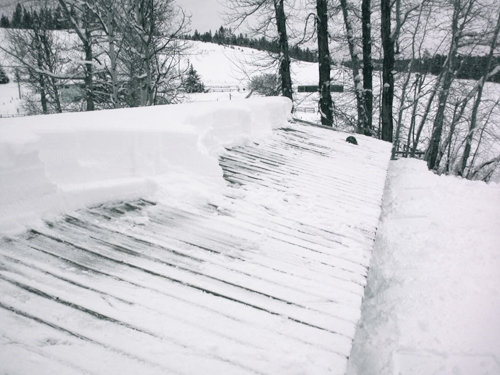
A rafter that has a 25 lb snow load is overloaded with only 15 inches of wet/heavy snow or 5 ½” of ice. Even a snowfall of only a couple inches can cause problems because of drifting snow. It cannot be stressed enough, remove all snow from roofs immediately to prevent an accumulation that may cause roofs to fail.
In addition to removing the snow and ice promptly you can also protect your building’s roofs by following the guidelines below before the winter season.
Check List and Winter Inspection for Swine Facilities
(A) Check to see that all trusses are in plane (sitting vertical and not leaning or out of square to the connected walls and lateral braces) and that there are no bowed or broken trusses.
(B) Check to see that all metal plates are intact and that they do not show any signs of stress (cracks, twisting, or pulling away from the lumber).
(C) Check to see that all web members are not bowed or broken.
(D) Make sure that all lateral braces are intact and are not loose and that nails have not pulled away.
(E) Select areas in the building and rake the insulation back and check the bottom cord lateral braces and make sure that they are intact.
(F) Look for areas in the barn and attic that may show moisture (inspect ceiling insulation for evidence of roof leaks).
(G) Check ridge caps and eave inlets for missing closure strips (it is crucial that buildings do not accumulate any snow in the attic). Close any summer air inlet doors.
(H) Keep snow from drifting up against the sidewalls of the buildings.
(I) Remove snow promptly from roofs.
(J) Do not pile snow under or by eave.
(K) Check gable end where fans are hung for pulled or broken boards.

Every now and then we stumble across a product or idea from another industry that we can adapt for use in the swine and poultry business. Chorelite boots are one such product.
Designed for use as a deck boot in the off-shore fishing industry, it’s a unique product with features that will benefit swine producers and poultry growers as a chore boot for use inside of confinement buildings.
The first thing you will notice about the Chorelite is how extremely lightweight it is. The Chorelite boot is constructed of EVA expanded rubber (similar to the material used in Crocs™ sandals) to create a lightweight but durable boot.
 To give you an idea of how lightweight the Chorelite boot is; a typical rubber chore -type boot weights about 2 ½ lbs. Contrast that to the Chorelite that weighs in at only 10 ozs.!! Less weight equals less fatigue at the end of the day.
The Chorelite boot’s one-piece, molded construction means there are no seams to separate and leak. The bottom tread is designed to be non-slip (remember the off-shore deck boot?) without being too deep preventing large amounts of muck from accumulating.
You will also notice the Chorelite boot is unlined making them easy to clean and disinfect. You can wash them up, dunk them in a bucket of disinfectant and hang them upside down to dry. They will be ready next time you walk back in the barn
When we first received the boots we were skeptical about their durability because they were so lightweight. We put 10 pairs on the personnel of a local sow farm last July. In six months of daily use they reported no tears or punctures in the boots…no leaks…..and the tread wear was excellent.
Now don’t get us wrong, even though we introduced this product during the winter, this boot wasn’t designed to keep anybody’s feet warm. This is un-insulated boot for use inside of a confinement hog barn or chicken house. It is water-proof, lightweight and easy to keep clean.
To order click on http://hogslat.com/chorelite-boot or stop in at your local Hog Slat or Georgia Poultry store and try a pair on for yourself.
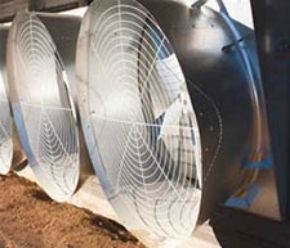
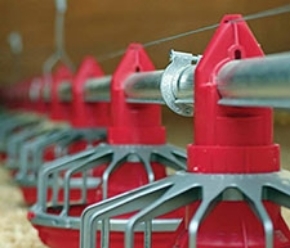
Tunnel Ventilation systems along with evaporative pad systems are effective at reducing summer temperatures in swine and poultry buildings. Here are some tips to keep your houses running at peak efficiency.
1) Bleed off water to control mineral content
As water is circulated and evaporated in a pad system the concentration of minerals is increased. This is especially true in areas that have hard water with its higher levels of dissolved minerals. It is suggested that 5% to 10% of the circulated water should be continuously bled out of the system. Alternatively you can also dump and replace the sump tank water weekly. Products such as Scale-Stop or Cool-N-Kleen Cool Cell Descaler can be effective in controlling scale buildup for farms with very hard water when coupled with bleed off.
2) Check pH
Desired pH level of the water should be between 6 and 9. The pH levels outside of the this range shorten pad life by leaching out the stiffening agents in the pad. You can alter the pH of the water by adding one of  the descaler agents listed above or Grower Select’s Kool-Cell Kleen.
3) Eliminate dry spots on the pad
Dry areas on the pads allow uncooled air to enter the building. Simply put, if the pad’s not wet it’s not cooling. Dry streaked areas on the pad are a clear sign that you have clogged holes in the distribution system. Remove the cover and unstop the clogged holes in the header system. It is a good practice to clean the distribution system by opening the ball valves and flushing water through at least once a month.
4) It’s a pain…but you have to clean the filters
Install a spin down water filter with a clear housing and 60 mesh screen on the system and keep it clean. It will prevent clogged distribution pipes and dirty pads. The poorer the water quality the more often the filters need to be cleaned. Installing a filter with a ball valve will simplify the chore.
5) Prevent algae growth
Although H2PADs are treated with an fungicide and come with ProTech edging to prevent algae from adhering to the pad surface, this does not completely eliminate the problem. Treat the system water with a good preventive product like Bio-Stop or Grower Select’s Kool-Cell Kleen to keep algae under control. In addition, the pads should be allowed to dry out once every 24 hours to improve the longevity of the pad. Program your ventilation system to allow the fans to continue to run awhile after the pad system is turned off at night. This will pull air through the system, drying the pads out and killing any algae spores.

A NEW Solution to Clean and Help Extend the Life of your Medicator
Medicator Rx is a water soluble concentrate, with Aqua Lube, that is designed specifically for maintaining and cleaning medicators used in swine barns and poultry houses.
It removes:
Medicator Rx solution also lubricates your medicator’s interior seals and all moving components as it cleans.
Medicator Rx can be used in two different ways, cleaning in-line and deep cleaning.
Medicator Rx is recommended to use when performing maintenance or repairs. One packet will clean one medicator.
Click here to order on line.
*Follow directions on packet.

Just saw some interesting info from Billy Farmer. Billy is the store supervisor in Georgia, and had just attended the 2012 Poultry Tunnel Ventilation Workshop at the University of Georgia. They always put out great technical informational at their workshops and this piece caught my eye. We all know that we should change v-belts on belt drive fans when they get worn but….why?
V-belts don’t actually stretch as is commonly referred. They get thinner as they wear. Because they get thinner, the belts will start to ride lower in the pulley groove. When this happens it’s just like the pulley becoming smaller. As the fan spins slower it moves less air. CFM delivery is directly proportional to the fan speed. Spin the fan 10% slower and it moves 10% less air. Reducing the CFM capacity of a building by 10% can spell disaster in terms of pig and broiler performance during the heat of the summer.
How do you know when to replace a V-belt?

A quick visual check will determine if a V-belt is worn and needs to be replaced. If the belt is riding above the pulley groove, it is doing its job. If the belt is bottomed out in the groove and/or riding below the top of the groove, it’s time to replace the V-belt.
While you have the V-belt off, you should take time to inspect to the pulley itself. A new pulley has a sharp V-shaped groove. A pulley that is more U-shaped is worn and needs to be replaced before you put on the new V-belt.


To make the job of replacing V-belts less expensive, Hog Slat developed our own line of V-belts called GroBelts. They are constructed of compressed rubber embedded with low stretch nylon cords. Hog Slat and Georgia Poultry stores carry a complete selection of the most popular sizes in stock. If you can’t make it to a local store, you can also order on line at http://www.hogslat.com/v-belts-grobelt-drive-belts and we’ll ship them directly to your door.

It’s not news to pork producers that hogs are hard on equipment. Just normal wear and tear will damage even the stoutest equipment.
One tough repair is a loose anchor bolt in concrete walls or floors. Whether it’s a wall bracket, divider panel or gestation stall leg, they can all work loose with the constant “banging” from large hogs. This not an easy repair; typically the anchor has to be removed and the hole drilled either larger or deeper to hold a new stud.
The new EPO-SET 400 makes this repair much easier.
EPO-SET 400 is a two-part polymer especially formulated for repairing loose anchor bolt studs. Simply clean the loose debris out of the hole around the anchor. Place the mixture into the void and it sets up in ten minutes with full strength in two hours.
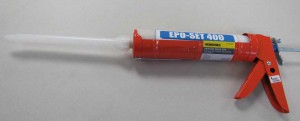
EPO-SET is easy to use because of the unique dual cartridge system for use in a standard caulking gun.
The standard sized tube contains two separate chambers that mix inside the static mixing nozzle. No need to buy an expensive two-tube caulking gun or mix the two parts in a tray before using. Just squeeze the handle and the blended mixture comes out the nozzle. Makes it easy to direct into holes and cracks in concrete.
You can watch our video at http://hogslat.com/epo-set-400 to learn more.


