Close
0
You have no items in your shopping cart.
Search
Filters
RSS

Blog posts of '2015' 'May'

Hog Slat Showcases Swine Equipment at EuroTier 2012

Billed as the world’s top event for animal production, EuroTier was held this past week in Hanover, Germany.  Producers from across the world attend EuroTier and for many it was their first exposure to American style production equipment as exhibited by Hog Slat.

We spoke with Hog Slat’s European sales manager, Kirk Brincks and asked about international producers comments concerning the equipment. He replied, “ Their general reaction is Hog Slat builds durable products that represent a good value.  They like the common sense design and how it is incorporated into the overall building layout.”

We asked Kirk what particular item was most popular, “ I would have to say the SowMAX dispensers.  All producers are facing high feed costs and feed saving equipment is important to them.  A customer, with sow farms in the Ukraine and Poland, has installed over 1,000 SowMAX units and is sold on the feed savings.”

He continued, “Another big item of interest is concrete slats.  We had many producers who see them for the first time and immediately comment on the quality.  I think people tend to view concrete slats as all being kind of the same, but we really do build a slat that will last longer.  Experienced producers seemed to recognize it very quickly.”

“And”, he laughed, “they always ask when are we building a slat plant near them”

Kirk finished up with, “The Grower Select line has caught on quickly. We have several production companies that we work with in identifying their high replacement items, providing them easy order forms and stocking those parts for quick delivery.   Grower Select just fits with Hog Slat’s basic philosophy of providing producers with a better value for their money……. in this case it’s excellent quality replacement parts that are priced right.”

Comments (0)
Better Start for Broilers

One of the steps in adding new items to our product line is on the farm testing.  Mike Lucariello, regional manager for Georgia Poultry in Missouri and Arkansas, did the initial trials using starter feeders vs. feed trays in his broiler houses.  We talked on the phone recently about his experiences.

How did you set up the trial?

Mike: “We took two houses and randomized the birds evenly between the breeder flock sources to eliminate any possible differences.  In one house we fed the chicks on traditional feed trays and in the other we set starter feeders under the feed lines. We then weighted the chicks at 7, 14 and 21 days.  The chickens in the starter feeder house were routinely 8-12% heavier than feed tray house.  We repeated the trial this time, switching the houses between trays and feeders and had almost identical results…..starter feeders are now part of our routine.


Describe how you set up the house with starter feeders?

Mike: Each of our houses holds 23,500 birds and we aim to have one supplement feeding station per 75-100 birds.  We can place 150 starter feeders between the pan feeders under the feedline. We also like to remove the pan under the control pan and replace it with a large 3×3 cardboard tray so the chicks will activate the control pan quicker.   We add additional 100 paper trays under the brooders that we feed by hand for 3 days.  After that we pick up the paper trays and replace the pan on the end control and all the supplemental feeding is done in starter feeders.


Any ideas why the chickens were heavier in the building using starter feeders?

Mike:   Yes, it is easier to keep supplemental feed in front of the chicks.  Using feed trays requires the grower to manually operate the feed system.  They have to run the feed system several times a day to put feed on the trays.  This becomes increasing difficult, as the chicks get older and more aggressive and start scattering feed as it drops in the trays in the front of the house. The grower has to shut off the front drops as they fill the trays so feed will be delivered equally to the end of the brooder area.   With the starter feeders you simply position the feeders under the feedline and fill them up.  Within a couple of days the control pan is regulating feed delivery automatically and distributing it down the entire length on the house.   Supplemental feed is always available to the birds.


Most growers would like to put out supplemental feed for ten days but with feed trays this can be a challenge.  Since the system is manual it’s a little bit of a guessing game to know how much feed to run out.  The chicks lie in the trays, scatter and defecate in the feed.    A real aggressive flock will waste so much feed growers will stop supplement feeding after eight days.


With starter feeders the birds can’t lay in the feed, they aren’t scratching feed into the litter and feed is always available.  We can easily keep supplemental feed in front of the chickens for 15-16 days with very minimal wastage.


That early feed intake is critical.  The faster we can get their allotment of starter rations into the birds the heavier those chickens will be at settlement.


We understand not everyone is proponent of starter feeders?

Mike: Yes that’s true.  Some people will argue feed trays provide more eating space.  Consider this, when there are 100 birds lying in a feed tray, access is very limited.   We think their access to feed is increased vs. trays because birds are not covering up the feed.


Do you clean the feeders between flocks?

Mike: No, because the birds can’t mess up a starter feeder like they do a plastic feed tray.  We save quite a bit of labor not having to clean the feeders like we would if we used plastic trays.


Georgia Poultry is now offering an even better price on starter feeders than ever before.  Go to www.hogslat.com/hi-grow-pre-starter-chick-feeder.  Run a trial on your own farm.   Start birds faster and gain a competitive advantage at settlement.

Comments (0)
Factors Impacting Feed Conversion

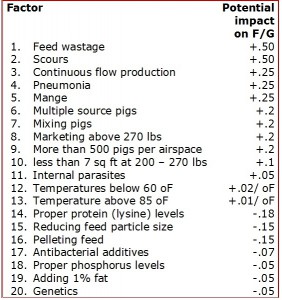
Here’s a thought provoking list of 20 factors that effect feed conversion in swine production. We pulled this information 0ut of Jim Long’s Pork Commentary on Dec 17th which he cited Vern Pearson PhD and Mariela Lachman PhD.   As Jim noted with the cost of feed rising so dramatically, effectively utilization of rations has never been more important. Number one on the list?... feed wastage.

Hog Slat manufacturers feeders that have been proven to save feed for over 25 years.  Hog Slat dry feeders are the industry’s standard in finishing and nurseries barns, our wet/dry and round fiberglass feeder are additional options and we continue to pioneer sow feeding in breeding and farrowing with SowMAX. Choose Hog Slat hog feeders and feed system components for your next replacement, remodel or new construction project.  

Comments (0)
Anchor Bolt Repairs are fast with EPO-SET 400

It’s not news to pork producers that hogs are hard on equipment. Just normal wear and tear will damage even the stoutest equipment.

One tough repair is a loose anchor bolt in concrete walls or floors.   Whether it’s a wall bracket, divider panel or gestation stall leg, they can all work loose with the constant “banging” from large hogs.  This not an easy repair; typically the anchor has to be removed and the hole drilled either larger or deeper to hold a new stud.

The new EPO-SET 400 makes this repair much easier.

EPO-SET 400 is a two-part polymer especially formulated for repairing loose anchor bolt studs. Simply clean the loose debris out of the hole around the anchor.  Place the mixture into the void and it sets up in ten minutes with full strength in two hours.

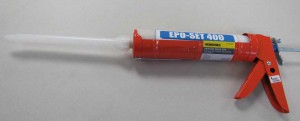
EPO-SET 400 gun_edited-1

EPO-SET is  easy to use because of the unique dual cartridge system for use in a standard caulking gun.

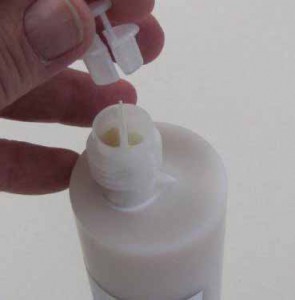
EPO-SET chambers_edited-1

The standard sized tube contains two separate chambers that mix inside the static mixing nozzle.  No need to buy an expensive two-tube caulking gun or mix the two parts in a tray before using.  Just squeeze the handle and the blended mixture comes out the nozzle.  Makes it easy to direct into holes and cracks in concrete.

Back Camera

You can watch our video at http://hogslat.com/epo-set-400  to learn more.

Comments (0)
Sow Group Housing Conversion Answers Welfare Concerns

MB stanchions_3_edited-Large

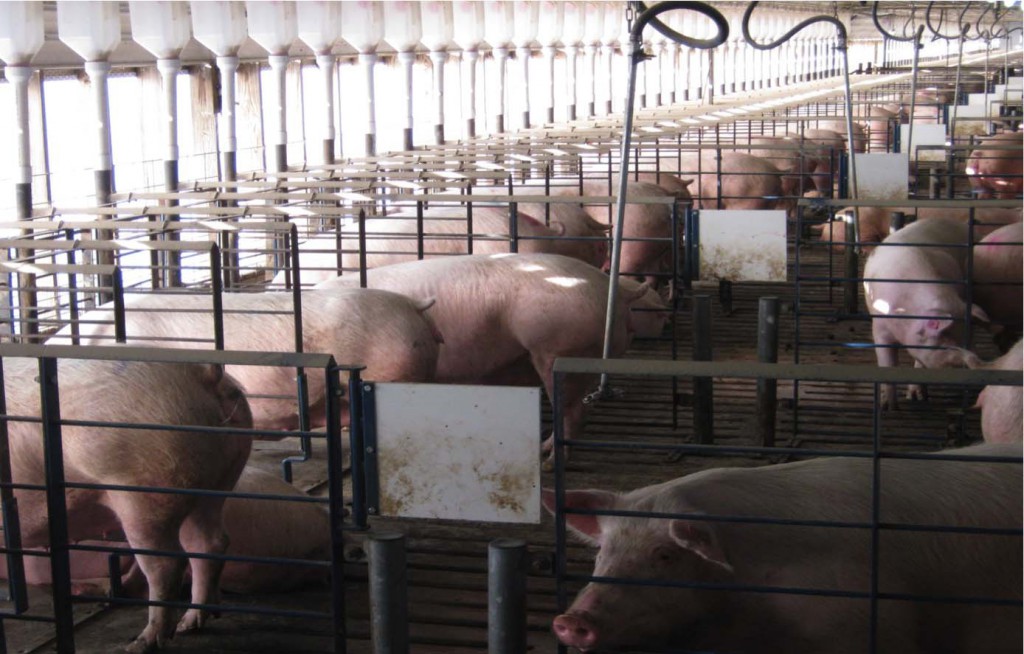
Murphy-Brown’s North Division has completed one of the largest stall to group housing conversions in the industry. All the company farms have been converted to group housing over the last four years; 58,000 sows in total.  Keith Allen, General Manager of the North Division, discussed the conversion.


Keith, how did you decide on the type of group system?

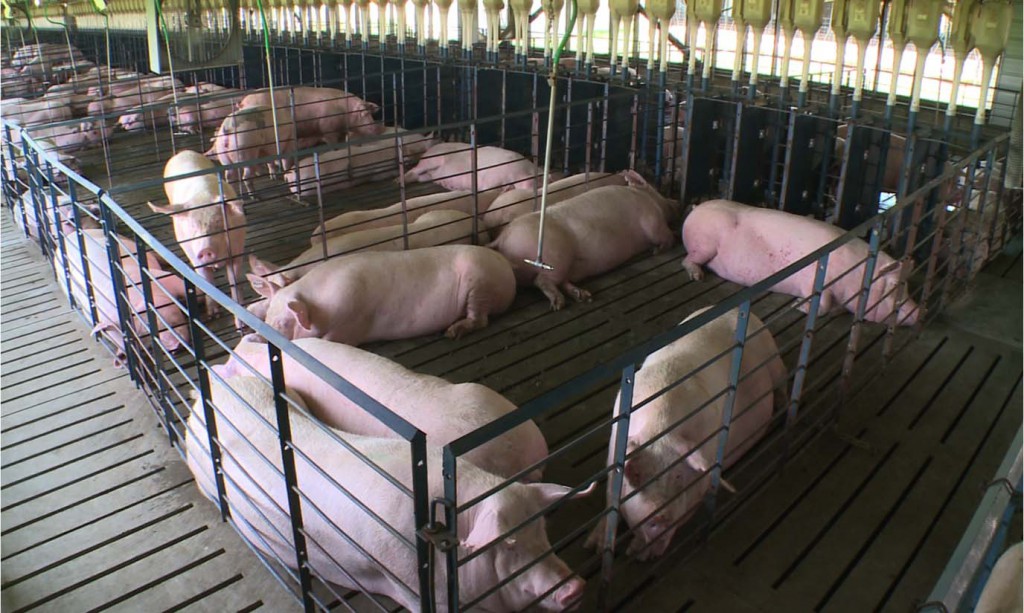
“Long before we announced our conversion plans, we toured several types of housing systems abroad; ESF (Electronic Sow Feeding), Free-Access stalls and Pens with feeding stations or Stanchions.  We felt stanchions would require the least amount of cost and would be easiest to manage. The results four years post conversion support that decision.”
 

MB stanchions_4_edited-Large

Can you explain that a little further?

“Our production records validate improvements for any metric you can compare, pig/born, pigs weaned, etc.  The company farm production records rank better than most contract growers with stall gestation.  Sow mortally is neutral when compared to traditional stall operations in the system.  Fighting is less than we expected. Although we anticipated higher feed consumption in gestation, it also has remained neutral.”

Do you manage any other types of group housing systems to compare stanchions to?

“We have a large 10,500-sow unit with ESF feeding stations.  The repair and maintenance of the feeding stations requires a full time employee on this operation.  There is extra labor involved with the management of the animals.  Every day the computer system prints a list of animals that didn’t record entry into the ESF from the previous day.  An employee must locate those animals and identify why; Is she sick? Did she lose her tag? Is the feeding station in need of repair? Etc.”

“We just don’t have the extra labor costs or the maintenance in our stanchion type barns.”

“Free access stalls don’t have the same issues, but are more expensive to construct and present an increased opportunity of equipment failure with the gate latching mechanism.  There is also a chance an employee inadvertently or purposely could lock the animals in the stalls, and then we really don’t have loose pen housing anymore.”

How did the transition go on the farms?

“The transition was seamless; our employees now prefer stanchions to the stall system we used before.”
 

MB stanchion floorplan_edited-LARGE 

What are basic design requirements you used?

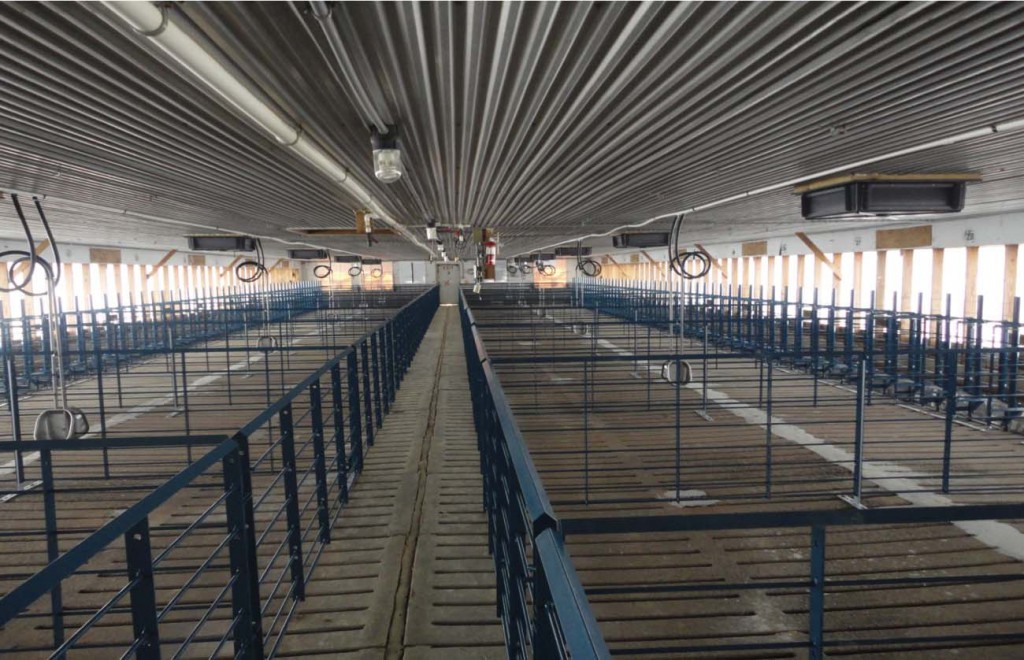
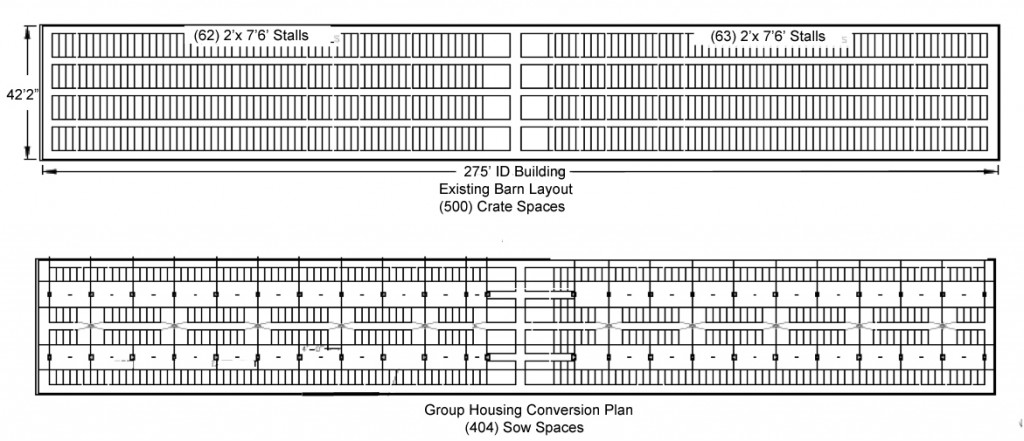
“We designed the pens to hold six sows with 24 square feet per animal; there is one feeding stanchion per sow.  The stanchions are 24” wide, and the dividers are 18” long.  The length of the divider is important; this divider should be long enough to extend past the shoulders. By extending past her shoulder, she feels more comfortable and secure when eating.”

“The facility design provides breeding stalls to house sows for 35 to 42 days post insemination.  After preg-checking, sows are grouped by size and moved to the pens.”

“An additional 3-5% of stalls have been added in the Group Housed gestation barns to provide critical care space for any animals that may require extra care or must be removed from the pens.”
 

MB stanchions_1_edited-Large

Have you made changes to the design over time since beginning the conversion?

“Yes, our original layouts allowed for 7% extra stalls in the group housed gestation barns…..we have since cut that back to only 3-5%.”

“We have also realized it is unnecessary to have an alleyway between rows in group housed gestation. We simply mount the stanchions and sow feed drops head to head. One of the things you lose with group housing is the ability to regulate individual feed intake…..you manage by pens, so there isn’t a lot of adjustment to the drops.”

“We also have added “Access Doors” to the pen dividers to make it easier to walk from pen to pen.  These consist of two posts set far enough apart that a person can squeeze through with a swinging solid divider on top to prevent the animals from attempting to go over the opening.  We no longer have to climb pen dividers to check sows.”

How have the changes been viewed by Smithfield’s customers?

“I have personally toured many representatives from large food companies through our remodeled facilities.  These companies made public commitments to securing pork from “stall-free” producers by a named date….they are listening to the consumer and committed to their long term Sustainability Programs.  In every case, the reps remarked how well cared for the animals seemed to be and remarked how clean the facilities were.   We think we have answered their concerns with this type of group housing.”
Comments (0)
An Improved Rodent Bait Rotation

Bait rotation is an important strategy for effective control of rodents in livestock and poultry buildings.  Continued use of one active ingredient or bait type may increase the risk for potential resistance problems.  Rodent populations may also prefer the flavor or texture of one type of bait.


Liphatech’s recent introduction of the new soft bait Revolver™ gives producers even more choices in their bait rotation program.


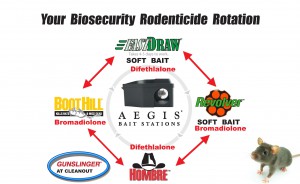
FastDraw and Hombre both contain the same active ingredient, Difethlalone.  FastDraw is a soft bait and Hombre is available as a mini block or place pak. Revolver and Boot Hill are formulation with the same active ingredient, Bromadiolone.  Revolver is the soft bait version and Boot Hill comes in either a mini block or pellet place pack.


New Bait Rotation_edited-1


Now producers can add another element, texture into their bait rotations.  Note the double orange arrows in the rotation diagram illustrating the possible choices.  For example if the first bait used was FastDraw the next choice in the rotation could be either Revolver (soft bait) or Boot Hill (mini blocks) as they both contain a differen active ingredient Bromadiolone.  If Boot Hill was selected the next step in the rotation back to Difethlalone could be either FastDraw (soft bait) or Hombre (mini blocks).


Also note on the diagram the rodenticide Gunslinger highlighted with the blue circle.  We highly recommend Gunslinger be inserted into any bait rotation at clean out as it most effective when animals aren’t present and feed sources can be removed. Gunslinger contains a completely different active ingredient, Bromethalin and its “knockdown” on rodent populations is impressive.


Shop the entire line of Liphatech® Baits today to compare their features and choose the best options for your operation.

Comments (0)
Extended Anchor Bearing Solves Tandem Bin Auger Overload

As livestock and poultry housing became larger and we developed more sophisticated feeding methods, the use of multiple bins in tandem was more common.  While this set-up allowed for greater flexibility in feeding, the front bin of the pair was often prone to plugging.

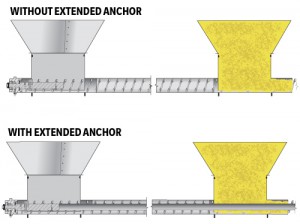
If we look at the anchor bearing that is present in the rear bin, one would notice that it has a restrictor tube over the shaft.  This restrictor tube fills the core of a flexible auger and prevents feed from filling the core and overloading an auger. This restrictor is not present in the front bin.  When the slide is opened feed overloads the system faster than the auger will move it away.  The obvious solution is to cut the opening down by closing off the slide to restrict feed flow.  This can cause other problems as a feed flows tends to flow only down one side of the bin.  A better solution is to use baffles in the boot to restrict feed flow.  This works to prevent plugging but can cause feed bridging in the bin.


feed-bin-auger-drawing-anchor-bearing


Over the last several years Hog Slat developed and tested a unique solution to this problem.  The final product is called the Extended Anchor Bearing.


Described simply, the Extended Anchor Bearing extends the rear tube restrictor to the front bin.  The auger core is filled in and feed cannot overfill the system.

The Extended Anchor Bearing ships complete with a 14’ restrictor tube, replacement bearing and fastening hardware.  The 14’ restrictor tube is cut to length and inserted it the auger core.  The new bearing is installed and the auger reattached.

If an extended anchor bearing would help you prevent auger overload, visit the Hog Slat website to find the model that fits your flexible auger fill system.

Comments (0)
Poultry Lighting- Advantages of LED Bulbs

1. Incandescent bulbs are being phased out by numerous countries (US included) making it now illegal to manufacture many incandescent bulbs leaving only those bulbs still in supply to sell. Usually the higher the wattage the more expensive and more difficult the bulb is to find now with the new laws in effect. LED bulbs do not face this issue and benefit from newer technology that is developing each year.

2. Incandescent bulbs are not efficient at all in terms of converting energy for just light production. Most of the energy is released as heat and not as light thus making them very inefficient. In contrast, LED bulbs convert nearly all their energy to light production and are very efficient. For example a 40 watt incandescent produces roughly 400 Lumens which is a little less than the average 8 watt LED bulb that produces about 450 Lumens. This fact alone makes it easy to see how LED bulbs can pay you back in energy savings over time, by giving you the same Lumens (light output) for much less electrical usage.

3. Incandescent bulbs have a typical lifespan of about 2,000 hours or less, CFL and Cold Cathode bulbs around 10,000 hours, and LED’s can have a lifespan over 25,000 hours. This means less time and labor required to change bulbs by switching to LED bulbs.

4. LED bulbs don’t lose their intensity like Cold Cathode does. Some research shows that after time Cold Cathode bulbs lose light intensity the older they get.

5. Our LED bulbs are fully dimmable and can be dimmed as low as 1%. They do not have issues like CFL bulbs do when dimming at lower levels and work on nearly all dimmers.

6. LED bulb warranties are longer. Most agricultural rated LED’s have a minimum of a 3 year warranty and some go as high as 5. Incandescent bulbs do not have a warranty and CFL and Cold Cathode bulbs usually only have a 1 year warranty.

7. Not all LED bulbs are alike. Do not confuse Agricultural rated LED bulbs and residential LED bulbs. They are not the same, and do not dim the same and thus do not perform the same. They may be more attractive due to their lower price, but they will not hold up in your poultry house like the agricultural rated LED’s will.

8. Some electrical companies, co-ops, and federal grants offer rebates or cost share programs that may be available in your area. Contact your local USDA Rural Development office to inquire about the REAP program or ask your electricity supplier for any rebates they may offer

9. By changing out incandescent bulbs to LED bulbs some have shown a payback as quickly as a few flocks, and if you are changing from CFL or Cold Cathode bulbs the payback can be around 1 to 2 years depending on your lighting program and setup. Regardless, know that by changing to LED you are cutting your energy usage, putting money back in your pocket, having a more durable and longer lasting bulb, and a bulb with a better warranty. Take the next step and invest in LED bulbs today!

Comments (0)
History of Sow Housing

I was scrolling the web for information on sow housing and ran across this piece authored by John J. McGlone, PhD at Texas Tech University.  Here are some highlights:

First mention of sow stalls was in 1807 in Baxter, England.

Lubbock Swine Breeders housed sows in stalls starting in 1964/1965.  These stalls featured a sand area behind them.

To read the full article, click the link below:

The Crate (stall, case,cage, box, etc): Its History and Efficacy – John J. McGlone, PhD

I found it to be interesting reading and hope you do too.

Comments (0)
Feed System Checklist for Hog & Poultry Buildings

Most producers have a checklist for basic equipment repairs between groups to prevent costly and time-consuming problems later. One commonly overlooked item is the feed delivery system. Whether you choose to have the auger inspected by a service crew or do the work yourself, the following is a checklist of essential feed system maintenance items for producers to consider.

Remove the Feed
The most important and basic procedure for auger maintenance is to empty all the feed from the system. Feed left in the auger tube will draw moisture and cause the auger flighting to rust.

Upper and Lower Boots
The metal lower boots should be visually inspected for worn or rusted areas, bent slide gates and damaged access covers. GrowerSELECT® components can be used to replace individual items including body weldments for all flexible auger sizes. Go to GrowerSELECT Unloader Components.

Grower Select clear upper boots can replace existing solid boots so potential problems with feed delivery are easier to spot.  Injected from impact-resistant transparent polycarbonate, GrowerSELECT boots will fit any 16” bin opening and are available in 30° or straight models. Go to GrowerSELECT Clear Boots

Anchor Bearings
Auger bearings are a high wear item and should be checked whenever they are squealing or rattling. To inspect the anchor bearing, loosen the U-bolts holding the bearing, pull the bearing out from the tube and clamp a vise grip on the auger to hold it in place. Inspect the anchor bearing for visible wear and excess play. If the bearing needs to be replaced, select a GrowerSELECT anchor bearing that matches the size and brand of your system. Go to GrowerSELECT Anchor Bearings

Flexible Auger
Auger that is more than ten years old or installed with multiple turns should be examined for wear. Examine the auger to look for sharp edges concentrating on the elbow areas. Also check the distance between the flighting making sure this distance has not been compacted or stretched. To remove the auger for inspection; detach the anchor bearing from the auger and allow the auger to retract inside the tube. Go up to the drive unit and open the inspection plate on the control unit. Loosen the hex head bolt on the clamp holding the auger to the tube anchor. Holding the auger solid, rotate the anchor counterclockwise until the auger is free. Go back to the boot area and pull the auger out the back end of the system.

There are several options for repair.
A) Replace the entire auger.
B) Cut out and replace only the worn section.
C) Turn the auger end for end and replace. This will place the worn section of auger in a straight section of the tube instead of in an elbow section.

Grow-Flex™ auger is available custom lengths that are cut to order. Go to Grow-Flex™ Auger

Elbows
Many (most?) 10-year auger systems have duct tape over small holes in the tube where the auger enters the barn. Now is the time to replace the high wearing elbow sections while the auger is removed from the system.

Gear Head Oil
The oil in auger gear heads should be completely replaced every two years. Remove the bottom and side plugs allowing the oil to drain out of the gear head. Replace the bottom plug and refill with oil until it reaches the level of the side plug. Replace side oil plug. GrowerSELECT Gear Oil is specialty 80W-90 oil designed for use in any existing auger gear head. Purchase GrowerSELECT Gear Oil here.

Pinion Gears
It is also a good time for a visual inspection of the pinion gear connecting the motor shaft to the gear head. The teeth of the pinion should be sharply cut; pinions with rounded teeth should be replaced. There is a GrowerSELECT replacement pinion gear for most existing auger systems….Go to GrowerSELECT Pinion Gears

Feed Level Controls
Faulty feed controls can cause feed outages or wastage when they malfunction. There are many options of GrowerSELECT feed level controls available for replacements. The HS529 is a direct replacement for feed level controls mounted in the feeders. The Proxy Plus (HS10) and the Proxy Classic (HS09) are GrowerSELECT replacements for existing proximity switches.
This may also be a great time to consider a complete change in feed control switches. The Grower Select Drop Tube Control Switch (HSDTC01) is an excellent option for controlling the feed system. This type of switch removes the electrical components from inside the feeders helping minimize switch failure due to electrical problems.

Feed Bins
Older feed bins may have rusted areas or even pinholes in the exterior metal sheets. An excellent product to restore these areas and extend the bin’s useful life is AMC100L; an aluminum based coating that provides corrosion and weather protection. It is available in DIY kit form containing 1 quart of AMC100L, 1 pint of rust remover and 4 pieces of seam tape. This starter kit will cover 200-300 sq ft. Purchase the AMC100L-K kit here.

Producers have also upgraded feed bins with a simple feed level indicator called the Bin Flag. This low-cost device (just over $100) allows operators to check bin feed levels without climbing. No wiring is required for operation and the installation is all done from the outside. The Bin Flag can also be connected to building alarm system for dialer notification of feed outages. Go to Bin Flag.

Contact a local Hog Slat store (see store listings) or go to http://www.hogslat.com/feeding-systems-componentsto order feed system repair items. Hog Slat stores also have service crews available for on-farm repairs and inspections.

Comments (0)